You may well have heard mention of GoAnywhere Agents but not actually had any real exposure to them.
GoAnywhere Agents contain ‘mini-me’ GoAnywhere capabilities, and the Agent software is deployed on machines at remote locations or deployed to cloud environments such as Azure or Amazon AWS.
These Agent remote locations can then be directly accessed from your main GoAnywhere Administration Console using workflows and their respective calling mechanisms.
Agent deployment enables files to be transferred to and from these remote locations, and even onward from those remote locations to external network shares or external server resources within the domain where the Agent resides. Agent file transfer can work both ways.
The Biggest Use Cases for Agents
The two main use cases for deploying GoAnywhere Agents are as follows:
- To enable organisations with a distributed office or branch structure to securely disseminate information to multiple remote domains from one centralised solution.
- To enable files to be transferred into network shares or file archives at remote sites within an organisation which may not be available directly from the main Administration console.
GoAnywhere Agents come in two flavours, Standard and Advanced Agents.
Standard Agents
Standard Agents provide the following functionality:
- Automate and secure file transfers within a centrally managed environment
- Monitor folders on agent systems for new or modified files
- Schedule agent file transfers to run at future dates/times
- Provide additional workflow capabilities such as zip and unzip, data parsing, database integration and PGP encryption and decryption
- Send email or text message alerts when agent file transfers fail
- Feed audit data to GoAnywhere MFT for central reporting
- Deploy automatic notifications if an agent goes offline
Advanced Agents
Advanced Agents include all the functionality of Standard Agents with the addition of SFTP server resource connectivity, native SSH command execution, and the utilisation of Web Services capabilities (REST/SOAP).
There is lots of general information online about GoAnywhere Agents but there are few examples of Agent projects interacting with GoAnywhere Admin console projects.
In this top-tip I will show an example of how a top-level workflow in the main admin console might then call an Agent project. The Agent project then connects to an external SFTP server which is accessible from its own network domain and copies the files off to that remote server location.
How Do Agents and Agent Projects Interact with Projects in The Main GoAnywhere Console?
Agent projects are configured from within the main GoAnywhere administration console from the Services > Agents > Agent Manager menu option, under the relevant Agent.
I have an Agent called Sam23 which is located on my laptop

Clicking on the Agent Name, opens the Agent Console. Each Agent has its own set of Resources, Projects, Schedulers and Monitors that can be defined within its Agent console.
The resources set on an Agent is a cut-down version of the resources set in the main administration console.

An Example of an Agent Project in Action
First, Create A Top-Level GoAnywhere Project Workflow
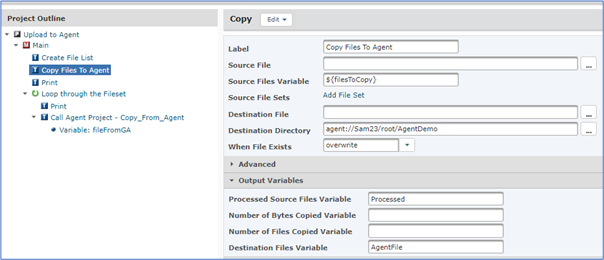
From the main GoAnywhere administration console, create a top-level project which will collect a file set and copy these files to the specified GoAnywhere Agent.

Once the files have been copied to the Agent, an Agent Project will then run to process these Agent files onward. This could be onward to an archive network share on the Agent domain, or, as in this example, to an external SFTP server resource that is on the accessible only from the Agent domain.
As an external SFTP server is being utilised in this Agent project, an Advanced Agents licence would be required.
Call The Agent Project from the Top-Level Project
Once the files have been saved to the Agent, the top-level project loops through that file set and executes the Agent Project for each file in the set.

Alternatively, the Top-level project could copy all the files to the Agent and then the Agent Project could contain the looping logic to process the files from the Agent. In this latter case, the Agent Project would only need to be executed once, whereas in my example I am executing the Agent Project multiple times – once per file in the loop.
To run an Agent project, select the command ‘Call Agent Project’ and add into your project outline. Complete the relevant fields as below to select the Agent and the Agent project to run on that Agent.

Pass a variable into the Agent project that represents the name of each file that was copied earlier as part of the ‘Copy Files To Agent’ step (only the filename can be used here and not the full path to the Agent).

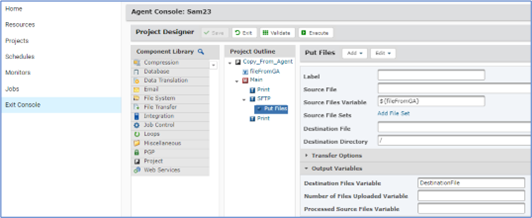
The Agent Project which executes in my example Project (shown below) is taking each file saved to the Agent and sending it to an external SFTP server resource connected to that Agent – using an SFTP Put command.

