GoAnywhere now supports the use of the free OAuth Connector to retrieve mail from mailboxes using the IMAP protocol and OAuth2 authentication. This blog explains how to configure the OAuth connector to poll a Mailbox resource in GoAnywhere so that emails or attachments that match a certain criterion can be transferred through GoAnywhere via an automated workflow.
As of October 2022, basic authentication for many Microsoft products is being disabled. Since some GoAnywhere customers use the MS Exchange Server online within their workflows, the GoAnywhere Development team has released a new connector to obtain the needed token for authentication. The new OAuth Online Connector is available for free download from the GoAnywhere Marketplace (System > Add-ons).
To configure the OAuth connector to poll a mailbox resource in GoAnywhere and authenticate it with OAuth, log into the Azure Portal at https://portal.azure.com and follow the initial steps below:
- Select App Registrations
- Select New registration
- Define the Name for the application, which is the user-facing display name. This name can be changed later.
- In the Supported account types section, choose who can use this application or access this API by selecting the radio button next to one of the three account types. The Help me choose... link supplies definitions for the different account types.
- Select Register to register your new application.
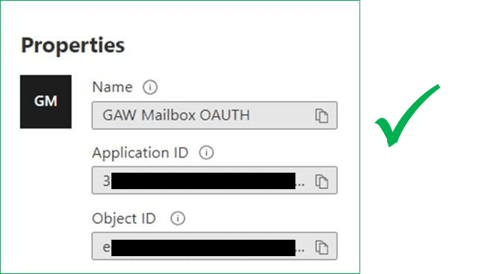
- On the Overview page, you will see your Application (client) ID.
- Copy the Tenant ID.
- Copy the App ID.
- Go to the Enterprise Applications
- Find the application registration you just created.
- Select the Application to open the Enterprise Apps > Properties view and copy the object ID from here. Do not use the Object Id on the Application registrations page.
- Navigate back to App Registrations.
- Add a Client Secret – copy this before it is hidden. It is the Value field we need not the Secret ID field.
- In the Azure portal, choose the API Permissions blade in your Azure AD application's management view.
- Select Add permission.
- Select the APIs my organization uses tab and search for "Office 365 Exchange Online".
- Click Application permissions (not delegated permissions).
- For POP access, choose the AccessAsApp permission. For IMAP access, choose the IMAP.AccessAsApp permission but please note that GoAnywhere MFT Mailbox Resources do not support POP-3 with OAuth.
- Select Add permissions.
- Select the ‘Grant Permissions’ Tick button to accept the Permissions. This requires Admin Access in Azure.
Once you have completed the initial Azure configuration there are two further configurations that must be completed through PowerShell. These register a link to your application with Exchange Online and set permissions to a mail account within your application. These two steps are completed using two cmdlets.
To use the cmdlets, install the ExchangeOnlineManagement and connect to your tenant using the three commands shown in the following snippet. Note that the TENANT_ID is the same as identified in step 7 above.
21. Open PowerShell.
22. In PowerShell, run the following 3 commands one by one:
Install-Module -Name ExchangeOnlineManagement
Import-module ExchangeOnlineManagement
Connect-ExchangeOnline -Organization {TENANT_ID}
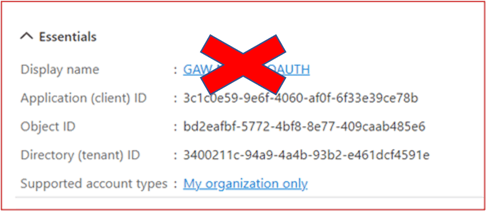
In the two following cmdlet steps DO NOT USE the Object Id shown in the App Registrations screen. Use the Object Id collected from Enterprise Applications View in step 11, an example of which is detailed below:
DO NOT USE THE OBJECT ID FROM THE APP REGISTRATIONS PAGE
Now, you must register your AAD application's service principal in Exchange via Exchange Online using the New-ServicePrincipal cmdlet.
If you get an error running the New-ServicePrincipal Cmdlet after you perform the steps below, it is likely because the user doesn't have the permissions in Exchange online to perform the operation.
23. Type the following command into PowerShell:
New-ServicePrincipal -AppId <APPLICATION_ID> -ServiceId <OBJECT_ID> [-Organization <ORGANIZATION_ID>]
…where App ID is the App Id, and the Service Id is the Enterprise Application’s Object ID. Tenant ID is the Tenant (Client ID) from App Registrations
Now you need to run the second cmdlet. This adds permissions for an email account to your application.
24. Type the following command into PowerShell:
Add-MailboxPermission -Identity "john.smith@contoso.com" -User
<SERVICE_PRINCIPAL_ID> -AccessRights FullAccess
...where -Identity is the email account to be accessed, and -User is the Enterprise Application’s Object ID
Wait a few minutes for Azure to synchronise with the new permissions in the Connector app being tested within GA. It could take some time – up to 24 hours.
Setting up the Connector, the Mailbox resource and the GoAnywhere Project
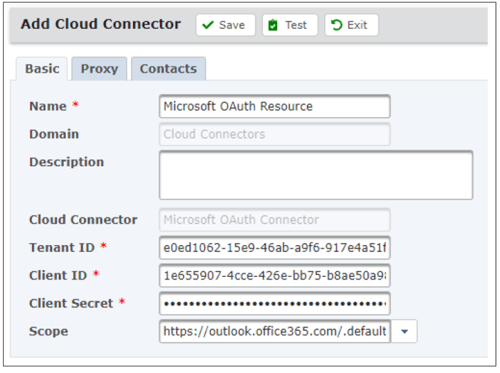
Once these steps have been completed, you need to first set up the OAuth connector in GoAnywhere with the correct Tenant, App Id (client) and the Client Secret from steps 7, 8 and 13, and then test the GoAnywhere connector to verify that it generates a token.
Copy the entire token to notepad, as you will use this for the initial test when you set up the Mailbox resource later.
Using the OAuth Connector Authenticate enables a token to be automatically generated and authenticated for the Mailbox tasks to be used within a project. Valid token codes change frequently so this combination of the connector and the Mailbox resource always automates the authentication with the latest token.
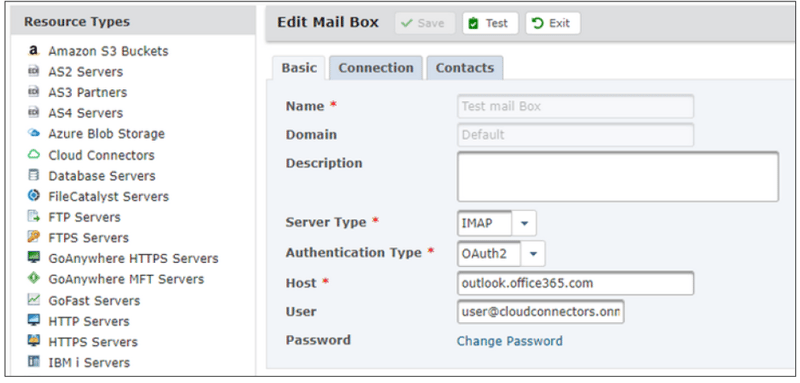
So, now you need to create a GoAnywhere Mailbox Resource with the following fields completed:
Server Type: IMAP
Authentication Type: OAuth2
Host: in this case for Office 365 this is outlook.office365.com
User: the email account permissioned in the Azure cmdlet (identity)
Password: [may not be required depending on Account source]. A password is not required for this example.

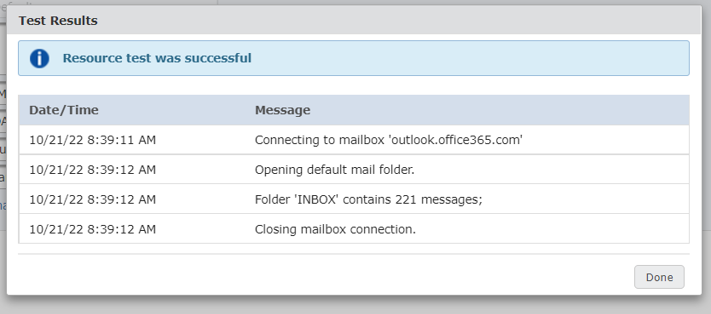
Test that a connection succeeds by entering the token value generated and copied to notepad earlier.
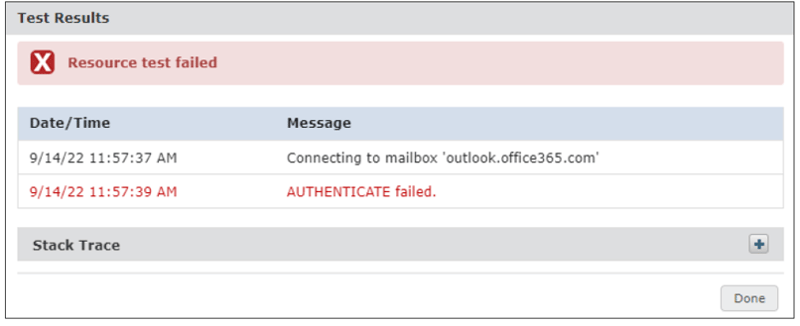
If the resource test fails, this is likely to be related to Azure permissions or an incorrect user in the user account field. The user referenced should be the same as the user account permissions in PowerShell Add Permissions cmdlet.
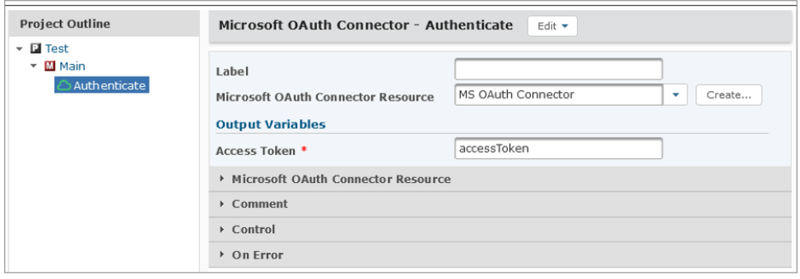
To link the Cloud connector to a mailbox resource, use a project and the OAuth connector Authenticate command available from the component library.
From within the Project Designer page, expand the Cloud Connectors folder in the Component Library, expand the Microsoft OAuth Online Connector menu, and then drag the Authenticate action to the Project Outline.
On the Authenticate action, specify a value for the following fields:
Microsoft OAuth Online Connector Resource - select a pre-configured Microsoft OAuth resource
Access Token - add a Variable name in which to store the Access Token (this can be any name at this stage and will be used later)
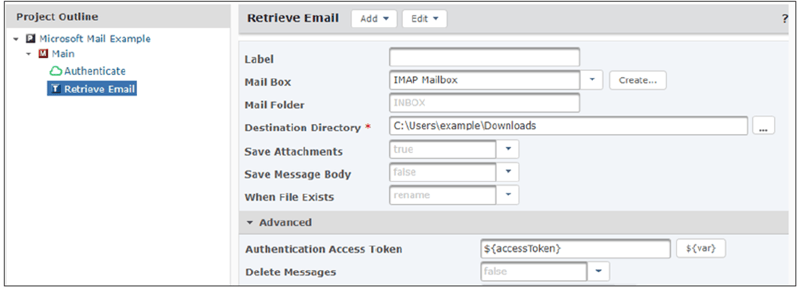
From within the Project Designer page, expand the Email & SMS folder in the Component Library and then drag the Retrieve Email action to the Project Outline.
On the Retrieve Email action, specify a value for the following fields:
Mailbox - The Mailbox resource to use
Destination Directory - The file path where the attachments should be saved
Save Attachments - Whether to save the attachments to the destination directory
On the Retrieve Email > Advanced panel, drag the variable containing the Authentication Access Token defined in the Authenticate command into the field ‘Authentication Access Token’ as shown below. Your Oauth connector and your Mailbox resource are now linked!
An example of a completed OAuth Mailbox polling project
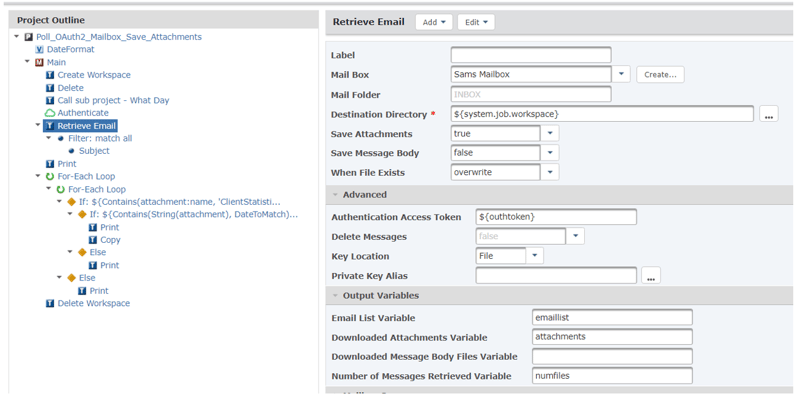
The project above is looking for emails with a specific Subject prefix as well as a specific attachment name prefix and a specific date in the attachment name which is stored in a variable called DateToMatch.
All files are stored in the temporary job workspace and only matching attachments are transferred. Deleting the workspace at the end of the project removes all unmatched files.
This project is also calling a sub project that establishes what the day of the week is, because this project is looking for a date in the attachment name that either matches today minus 1 if the day of the week is Tues-Fri, or today minus 3 if the day of the week is Mon.
The project above loops through the Email List Variable ${emaillist} created by the Retrieve Email command, and within that loop, there is an inner loop that traverses through all the attachments in each one of those emails in the list.
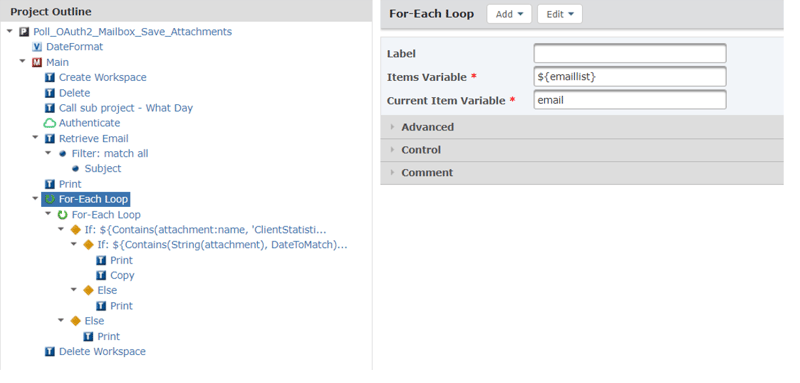
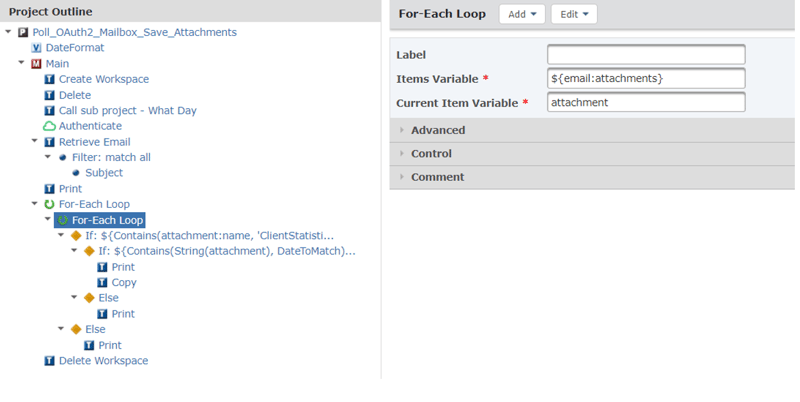
The If statements provide the logic that evaluates whether each email in the loop has an attachment with both the correct name prefix and the correct date (in a relevant date format that is passed into the sub project).
If both statement conditions are met, then the matching attachment is copied to a destination. All other files are cleaned up by the deletion of the temporary workspace.
Our team of GoAnywhere experts can support you in creating projects to poll mailboxes. Get in touch here.